
Learn to configure trusted ARC sealers
Email authentication has become a non-negotiable standard for companies and governments, as it prevents phishing, spoofing, ransomware, and other email-based cyberattacks. Email authentication protocols also raise alerts for modified email contents as these changes indicate tampering done by threat actors.
While most alterations are malicious, some are legitimate, too. There are some genuine email service providers that modify messages before they are placed in your Microsoft email inbox. These modifications trigger SPF, DKIM, and DMARC to fail for legitimate emails as well.
DKIM behaves as a robust email security protocol when dealing with uncomplexed relay situations, but it fails when an intermediate server modifies the message in transit.
Typical violations of DKIM include legitimate processes, such as an email gateway adding a footer or rewriting URLs. When these modifications are part of a legitimate business process, using an Authenticated Received Chain (ARC) is important. ARC helps preserve authentication results across intermediaries.
ARC resolves these issues and helps minimize email authentication failures for legitimately modified incoming emails. It works by preserving the original email authentication information at the email service, which also helps determine if alterations made to an email are safe or suspicious.
How does ARC work?
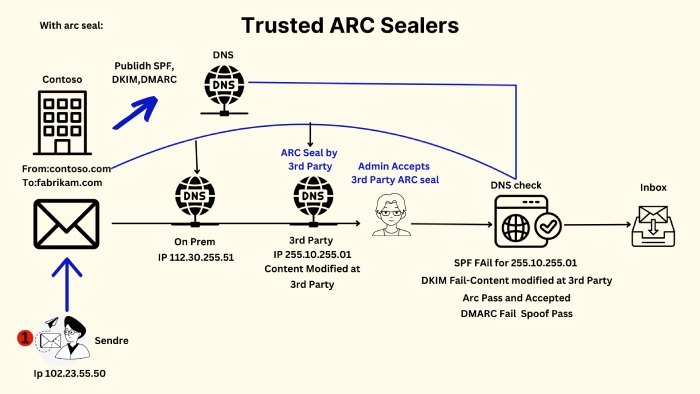
Here’s a simple breakdown of how ARC works to ensure the authenticity of email modifications by maintaining a chain of cryptographic signatures.
ARC Seal Creation
Each email handler (like forwarding services) adds an ARC header set, which includes:
- ARC-Authentication-Results (AAR): Shows the email’s authentication status (e.g., SPF, DKIM, DMARC) at that point.
- ARC-Message-Signature (AMS): A digital signature covering the email body and headers.
- ARC-Seal (AS): A signature that covers all previous ARC header sets, including AMS and AAR.

Validation of ARC Chains
When the email arrives at its final destination, the recipient’s email service checks the ARC chain by verifying:
- ARC-Seal integrity: Ensures no tampering occurred after the seal was applied.
- Legitimacy of intermediaries: Confirms the domains in the ARC-Seal are recognized and trusted.
- Consistency of authentication results: Compares AAR results at different stages for discrepancies.
Decision Making
If all ARC-Seals are intact and from trusted domains, the modifications are likely legitimate.
If there are broken seals, untrusted signatures, or inconsistent results, the modifications might be suspicious and possibly from a threat actor.
When to use trusted ARC sealers?
If you are a Microsoft 365 suite user, you need to identify trusted ARC sealers only if the emails delivered to Microsoft 365 recipients are frequently experiencing the following-
- Getting modified by intermediary services.
- Messages are failing email authentication checks because of modifications, such as changes made to the headers and footers or removal of attachments.
After you add a trusted ARC sealer to your Defender portal, Microsoft 365 validates the message’s authenticity using the original authentication information packed by the ARC sealer.

Adding trusted ARC sealers using the Microsoft Defender portal
- In the Microsoft Defender portal at https://security.microsoft.com, navigate to:
- Email & Collaboration > Policies & Rules > Threat policies > Email Authentication Settings in the Rules section > ARC.
- Alternatively, go directly to the Email authentication settings page using https://security.microsoft.com/authentication.
2. Next, you will come across the Email authentication settings page, where you have to verify that the ARC tab is selected. If yes, click Add.
Tip: If Trusted sealers are already listed on the ARC tab, click Edit.
3. In the Add trusted ARC sealers flyout that opens, add the trusted signing domain to the given space.
- The domain name must match the domain shown in the d value in the ARC-Seal and ARC-Message-Signature headers in affected messages.
- Use the following methods to view the message header:
- View internet message headers in Outlook.
- Use the Message Header Analyzer at https://mha.azurewebsites.net.
Repeat this step as many times as necessary. To remove an existing entry, click the x next to the entry.
4. When you’re finished in the Add trusted ARC sealers flyout, click Save.
Adding trusted ARC sealers using the Exchange Online PowerShell
If you’d prefer to use PowerShell to view, add, or remove trusted ARC sealers, connect to Exchange Online PowerShell and run the following commands:
View existing trusted ARC sealers
Get-ArcConfig
If no trusted ARC sealers are configured, the command returns no results.
Add or Remove Trusted ARC Sealers
Use the following command to use new ARC sealers in place of the existing ones-
Set-ArcConfig -Identity [TenantId\]Default -ArcTrustedSealers "Domain1","Domain2",..."DomainN"
The TenantId\ value isn’t required in your own organization, only in delegated organizations. It’s a GUID visible in many admin portal URLs in Microsoft 365 (the tid= value)—for example, a32d39e2-3702-4ff5-9628-31358774c091.
This example configures “cohovineyard.com” and “tailspintoys.com” as the only trusted ARC sealers in the organization:
Set-ArcConfig -Identity Default -ArcTrustedSealers "cohovineyard.com","tailspintoys.com"
To keep existing ARC sealers, make sure to list them along with any new ones you want to add. For more detailed operations, such as adding or removing ARC sealers without affecting other entries, refer to the Examples section in the Set-ArcConfig documentation.