How to find a DKIM selector for your domain?
The risk of cybercriminals intercepting your emails and tampering with them is perpetual. But there’s a way to mitigate this risk and make sure that your emails are delivered unaltered without any malicious interference. Implementing DKIM or DomainKeys Identified Mail is your masterstroke against email tampering and spoofing. It relies on cryptographic techniques to sign your emails, allowing recipients to verify that they truly originate from your domain and have not been messed with.
For this email authentication protocol to work, it is imperative that you have a configured DKIM selector. A DKIM selector is like a unique identifier that helps locate the public key in your DNS records.
Not sure where to find the DKIM selector for your domain? In this article, we’ll take you through everything you need to know about DKIM selectors— what they are, how they work, and where to find them.
What is a DKIM selector?
A DKIM selector is certainly one of the most important constituents of the email authentication protocol for DomainKeys Identified Mail. It identifies and retrieves the corresponding public key from the DNS record of a domain.
For every email sent out, a DKIM signature with the selector is added to the email header, which tells the recipient’s email server which public key to use in the sender’s DNS for verification of the authenticity of the email. The selector combined with a domain forms a complete DNS TXT record, which retrieves the public key used in verification.

It is the flexibility offered by the DKIM selector that allows you to rotate multiple DKIM keys without changing the configuration of the domain. So, if your organization uses different email services or servers, you can assign a different DKIM selector for each server. Doing this can help you ensure that all parts of your email system remain secure and trustworthy, preventing unauthorized access and tampering.
How does a DKIM selector work?
As you already know, a DKIM selector is an integral aspect of implementing the DKIM protocol, let us take a look at how it works to enhance email security.
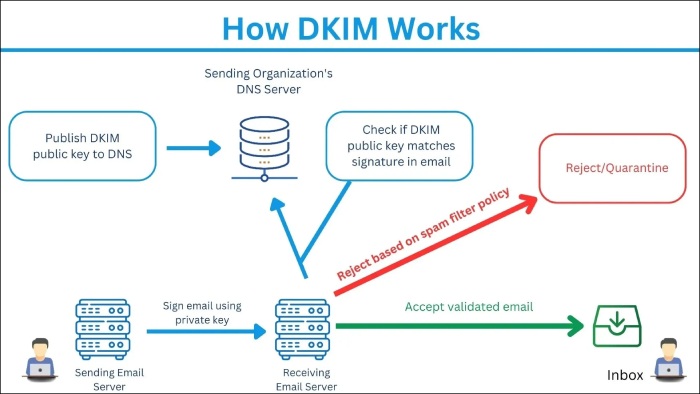
When you send an email from your domain, your sending server adds a DKIM signature to the email header. This signature includes the selector indicated by the “s=” tag, which helps identify the public key in the Domain Name System (DNS) and should be used to verify the email’s authenticity.
Now, when the email reaches its intended recipient, its server uses the selector along with the domain to form a DNS query, which retrieves the corresponding public key. The key then verifies if the email is really from the domain it claims to be and that it hasn’t been tampered with along the way.
What does a DKIM selector look like?
To be able to find a DKIM selector, you should know what it looks like. Let us explain this with a simple example.
For instance, if your hostname is s1._domainkey.example.com, s1 is your selector.
A selector is typically an alphanumeric string and can include hyphens, though the hyphen cannot be the first character. Moreover, you can configure any selector of your choice to suit your needs. Here are a few examples of DKIM selectors.
mail1._domainkey.example.com, then mail1 is your selector.
Similarly, in authkey._domainkey.example.com, authkey is the selector.
How do you find a DKIM selector?
When you set up DKIM for your domain, it inevitably creates a public and a private key, along with specifying a DKIM selector. This selector is included in the DKIM signature of your email. While the process of locating the selector might vary depending on the email service provider (ESP) or email client you are using, here’s a brief overview of how you should go about it:
Analyze the DKIM signature in the header
First of all, you should start by inspecting the DKIM signature in the header of the email. To do so, you can send yourself a test email, and once you open the email, click on the “View Source” or “Show Original” option in your email client. Here, you will find all the information about the email headers and source code, along with other technical information like the DKIM signature.

In the header section, look for the “DKIM-Signature” field, which contains several tags that provide information about the email’s authentication.
Identify the DKIM selector
Now that you know what a DKIM selector looks like, it should be easy to identify it. To reiterate, all DKIM selectors have the “s=” tag in the DKIM signature. This tag is followed by a string that represents the selector. In some cases of multiple signature headers, you might come across multiple selectors; you must identify the one that includes the domain.
Verify the selector
Once you have identified the selector, it is important that you verify it. Verifying the selector ensures that it is correctly set up and associated with the appropriate public key for your domain.
What if you’re unable to find the DKIM signature header?
If you are unable to find the DKIM signature header matching the specified domain, chances are that you have some issues with your DKIM configuration. In this case, it is recommended that you troubleshoot the settings, ensuring the selector and key are correctly set in your DNS records. After completing the process, send another test email and then check the headers for the DKIM signature.

DKIM implementation made easy with DuoCircle
Let’s face it: configuring DKIM is no easy feat, especially considering the complexities involved. But with a few simple steps, such as using selectors, periodically rotating the key, and using strict (difficult to decode) private keys, you can significantly enhance your email security. These simple yet effective efforts will not only safeguard your outbound emails but also reinforce the trust and reliability of your communication.
Need help deploying DKIM and other authentication protocols for your domain? Our experts at DuoCircle are here to your help! Get in touch with us to gain insights into our services.